A time comparison feature for time series reports was introduced to EMI in July 2017. This post provides some additional information and tips on how to use this feature.
Adding a time comparison to a time series report
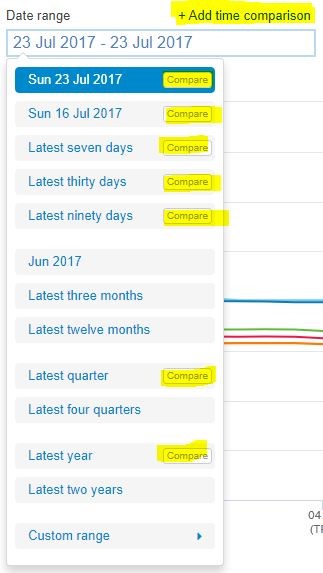
Time comparisons are only available time ranges of specific lengths. The date range drop-down on a report indicates what time comparisons are enabled. Not all comparisons shown in Figure 1 are available on all reports due to differences in the resolution of the data.
The comparison feature is enabled for any date range of the relevant length, not just the ‘latest’ available as a quick selection. To use a different base range rather than the latest for the report, users must use the custom range selection tool available at the bottom of the quick range options.
Figure 1: Date range selections with time comparisons

Step 1: Select a base date range
Select a base date range for a report that matches an enabled comparison setting (e.g. seven days). The ‘Add time comparison’ button will appear above the date range parameter.
Example: Wholesale prices at key nodes
Step 2: Add a time comparison
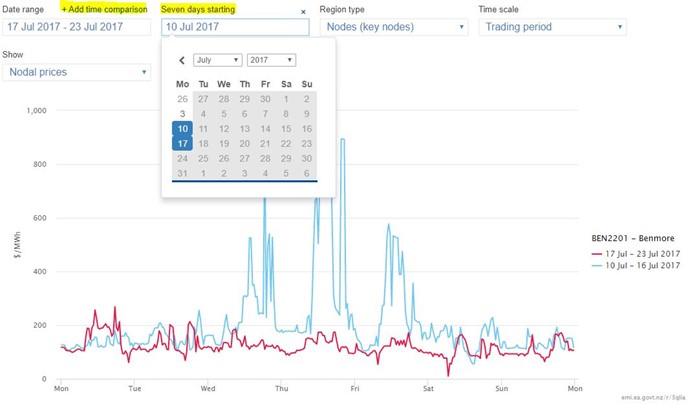
Clicking the ‘Add time comparison’ button will add a new parameter where users can select a start date for a day(s) comparison or year for a quarter or annual comparison.
This step can be repeated up to four times to add four comparison series to the base date range.
- Day comparisons allow any single day to be compared to any other single day
- Seven, thirty, and ninety-day comparisons are restricted to ensure that the same days of the week are compared across the series. (We may relax this restriction when we get some seven-day rolling averages included in the reports which will further enhance this feature)
- Quarter comparisons are restricted to comparisons of the same quarter and years to any other year.
Figure 2: Date comparison parameters

Example: Benmore wholesale prices
Step 3: Change the series for the comparison
Only one series can be compared against history in a single report. If more than one series was selected when adding a time comparison, the comparison will be applied to the first series selected in the series filter. It is then a simple step to change the series filter which will have now become a single select parameter.
Example: Otahuhu wholesale prices
Other parameters in the report can be changed while retaining the time comparison settings. This feature is a powerful tool for exploring the data. However, clearly adjusting the base date range for the report will wipe out the comparisons.
Example: Change from generation in the South Island to nodes to see how generation patterns have changed over the last four weeks
Step 4: Share your insights
As with all EMI reports, the permalink captures the parameter settings enabling users to easily share the view they see with others. Permalinks are accessed via the link icon in the report settings next to data download.
When you drill through to the data report users will see that only have the base series selected. They will need to adjust the date range parameter to select a contiguous data series covering the time period they are interested in, or alternatively, download separate files for each time segment.
Setting a comparison report so that latest data tracks against history
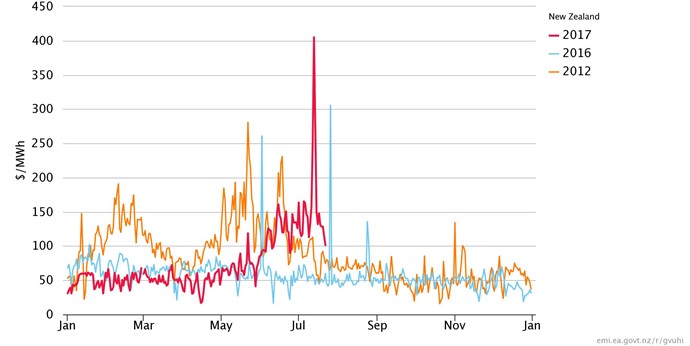
A nice feature that time comparisons enable is a report where the latest data tracks progress against historical data as new data becomes available. This result is achieved by setting the base series so that the latest comparison series overlaps only part of the base series. When a report is set up this way, the most recent series (red) is highlighted and will appear slightly thicker than the historical series.
Figure 3: New Zealand wholesale prices, 2012, 2016, 2017


